|
 |
 |
 |
 |
|
|
|||
|
PSP Format |
|
|
 Using Textures |
 Using Patterns |
 Layer Blend Modes | ||
| Get practical experience applying textures to your designs. Additional features include adding to an existing selection, and flipping your data in selections. | Gain practical experience applying patterns to your designs. Additional features include Selections the Retouch tool and burn mode. | PSP has 17 Layer Blend Modes. They can be utilized to enhance designs. Here you get practical experience using some of those Blend Modes while you put your design together. | |||
 Adjustment Layer |
 Image Borders |
 Picture Tubes 2 3 |
 Crop to Selection |
 Scratch Removal | |
| Learn about the Invert Adjustment Layer in conjunction with gradients, blend modes and your Retouch tool. Bring those dull images to life. | Give your photographs nice border edges by employing masks. Use fun filters to create a limitless amount of border shapes. All to enhance your images. | In this series of Picture Tubes tutorials learn the basics of the Picture Tubes tool. Learn how to create your own tubes, or to simply install tubes you download that have been created by tube enthusiasts. | Using the Crop to Selection feature gives your images soft edges! Using this feature is perfect for creating vignettes, and preparing images to be used in collages. | Got a torn crummy scratched photo? No problem! Learn to use the Scratch Remover to rid that photograph of defects. Understanding both Open-end and Pointed-end options. | |
 Special Effects |
 Sp Lighting Effects II |
 JPEG Artifact Remove |
 Vector Properties |
 Improve Skin tones |
|
| Do you have a portrait picture of someone that you want to add some of those studio picture effects to? No problem. Learn to use your Deformation tool, and layers to do just that, and more. | Discover tips to turn a day shot into a night time scene. Here's a quick technique for making the sides of an image darker, while creating an illuminated look to any area surrounding a predetermined object. | Over compressing any image when saving as a JPEG can trash your picture, causing artifacts to appear. Master your JPEG Artifact Remover. Minimize or entirely remove those formerly damaged areas. | Learn to use vector objects to make a design. Grasp how to change colors of an existing object using the Object Selection tool. Learn grouping individual objects together, to edit them all at the same time. | Have you ever taken a picture of someone where their skin tones look off? No problem. In this tutorial you will learn a quick and easy method to select the skin and correct the tone of just that selected area. | |
 Colorize Photos I |
 Add Depth |
 Soften Focus |
 Depth of Field |
 Saturation to Target | |
| Paint color onto B&W photos using channel splits, selections, and those wonderful blend modes. Achieve fairly realistic color photos from those black and whites. | Your Retouch tool has a number of exciting modes that can be used to enhance photos in many different ways. In this tutorial that Burn mode is used to add greater depth to an object in the image. | Learn to use the Soften mode on the Retouch tool to help some desirable focal object in your image stand out. | Use a selection tool and your Blur Average filter on the Effects menu to alter the depth of field in your photograph. | Saturation Down mode on the Retouch tool applies a saturation value equal to your foreground color in the Color Palette. All without affecting the hue or lightness. Use this mode to alter image backgrounds. | |
 Product Displays |
 Slide Templates |
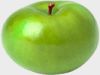 Adjusting Hue |
 Shift Colors |
 Retouch (smudge) | |
| Creating a backdrop with a backlit effect is a popular way to display products. This technique is useful in making ordinary objects stand out. In this lesson you create your own backdrop from scratch. | Presenting images in a slide is a nice way to avoid common frames. You will make a slide template, SAVE it in a PSP format with all its layers and selection information in place, so it can be used again and again. | Hue-Sat-Lightness allows for shifting those colors from one range to another. In this lesson you gain some experience in color shifting while turning a red apple into a green one. | Here you will select an object in the image and change those colors within that selection to another different color range. This technique is the easiest method for color changing when multiple tones of that color are present. | Feel like painting? Use the Smudge mode on the Retouch tool to create images with the look of an oil painting. Learn to blend your colors along with handling your brush strokes. | |
|
|